In nearly every Dynamics CRM project, you will be asked, at a time or another, to add an auto-numbering field to an entity. If you are (very) lucky, you can use the out-of-the-box auto-numbering feature, included in entities like Case, Campaign or Order. But if you are less lucky (let's say 99% of the time), you will be asked to add this feature on another entity, system or custom.
Dans quasiment chaque projet sur Dynamics CRM, on vous demandera, à un moment ou un autre, d'avoir un champ d'identifiant unique, numéroté par exemple, sur une entité. Si vous êtes (très) chanceux, vous pouvez utiliser un champ standard, inclus sur les entités telles qu'Incident, Campagne, ou encore Commande. Mais si vous l'êtes moins (99% du temps), il vous sera demandé de l'ajouter sur une autre entité, système ou personnalisée.
Hopefully, you have several options for that, each with some advantages and drawbacks. You can use some add-ons, with great options like custom formatting but with some cost, and sometimes unknown maintainability over CRM upgrades. You can use plugins, based on a "counter" custom entity. This won't require any license, but some development (so design and tests), and each enhancement will require more and more coding.
The third option, that I will explain today, does not require any coding, nor add-ons, just a few customizations. It sure has some limitations, but I think it is interesting enough to be detailed.
Heureusement, plusieurs options sont possibles, chacune avec ses avantages et inconvénients. Il existe de nombreux add-ons, avec des fonctionnalités intéressantes (mise en forme avancée par exemple), mais chacun à un coût, sans toujours connaître la compatibilité avec les nouvelles versions de Dynamics CRM. Vous pouvez aussi utiliser des plugins, basés sur une entité personnalisée souvent appelée "Compteur". Cela ne vous coûtera pas de licence mais du développement (et donc de la conception et des tests). Et chaque amélioration nécessitera toujours plus de développement.
La troisième option, que je vais présenter aujourd'hui, ne nécessite aucun développement, ni add-on, juste quelques personnalisations. Elle comporte forcément des limitations, mais elle est assez intéressante pour être détaillée.
So in this article, I will achieve the auto-numbering feature for the entity Contact. My field has to have this format : "CO" as a prefix and an incremental number, on 7 digits. For instance, the 421th created contact has to be : CO0000421.
Ainsi, dans cet article, nous allons ajouter un champ généré automatiquement, à chaque création d'enregistrement sur l'entité Contact. Le champ doit être de la forme : "CO" comme préfixe, suivi d'un nombre (incrémental) sur 7 chiffres. Par exemple, le 421ème contact sera de la forme : CO0000421.
I will introduce, step by step, the full method I used to do this. At the end of this demonstration, I will briefly explain the key points to notice, the advantages this method can introduce and also some limitations.
Dans un premier temps, nous allons parcourir, pas à pas, la méthode pour ajouter cette fonctionnalité. A la fin de la démonstration, nous verrons rapidement les points clés, ainsi que ses avantages et inconvénients.
In order to achieve this with no code, say as a prerequisite, your CRM system has to be at least CRM 2015 (7.0.0.0). You can use part of it with CRM 2013 (6.0.0.0), but with reduced functionality. Before (CRM 2011 and less), it won't work.
Pour y arriver sans une seule ligne de code, en tant que pré-requis, votre environnement CRM doit être au moins CRM 2015 (7.0.0.0). Vous pouvez également y arriver en CRM 2013 (6.0.0.0), en mode dégradé. Sur les versions précédentes, cela ne fonctionnera pas.
Ready ? Let us begin :
Prêts ? Commençons :
- First, create a new entity called "Counter", as below :
- Tout d'abord, créez une entité personnalisée, appelée "Compteur", comme ci-dessous:
- On this entity, create a Whole Number field, named Next Number, and a Single Line of Text field, named Prefix.
- Sur cette entité, créez un champ, de type Entier, appelé Prochain Numéro, et un champ de type Une seule ligne de texte, appelé Préfixe.
- Then, still on this entity, add a calculated field, Single Line of Text, named Next String Id. Set the formula as below :
- Maintenant, toujours sur cette entité, ajoutez un champ calculé, de type Une seule ligne de texte, appelé Prochain Identifiant. Définissez la formule du champ comme ci-dessous :
Note that this calculated field is only used for the formatting "Prefix"-"Number on 7 digits". Of course, the formula above is not finished ; it continues with "00", "0" and ends with Else Concat("Prefix", "NextNumber").
Remarquez que ce champ calculé ne sera utilisé que pour la mise en forme de l'identifiant, du type "Préfixe"-"Numéro sur 7 chiffres". Bien entendu, la formule ci-dessus n'est pas terminée ; elle continue avec "00", "0" et se termine par Sinon Concaténer("Préfixe","Prochain Numéro").
- When the 3 fields are created, you can add the fields on the main form, the "Active Counters" view and publish the customizations.
- Une fois les 3 champs créés, vous pouvez les ajouter sur le formulaire principal , dans la vue "Compteurs actifs" et publier les personnalisations.
- Create now a real-time child workflow, based on the entity Counter. It will be used to increment the counter at each Contact creation. Design the workflow as below :
- Créez maintenant un workflow temps-réel enfant, sur l'entité Compteur. Il sera utilisé pour incrémenter le compteur à chaque création de contact. Paramétrez le workflow comme ci-dessous :
The properties of the "Update" Step :
Propriétés de l'étape "Mettre à jour" :
- Save and Activate your child workflow.
- Enregistrez et activez le workflow enfant.
Now, you have created all your settings for your custom entity Counter. We will now add a counter on the Contact entity. Note that if you want to add this feature on Account entity (let's say AC0000421), you will have to start from here ; the first part has to be done only one time, the part coming next, once by entity.
Tous les paramètres de notre entité Compteur sont prêts. Nous allons maintenant l'ajouter sur l'entité Contact. Remarquez que si vous souhaitez ajouter un compteur sur l'entité Compte (par exemple avec AC0000421), vous n'auriez qu'à reprendre la méthode d'ici ; la première partie est faite une fois pour toutes, celle qui suit une fois par entité.
- On the Contact entity, add a N-1 relationship with the entity "Counter" we have just created. It can be Referential. Note that this relationship automatically creates a lookup field on the Contact entity. In my case, it is named Contact Counter (new_ContactCounterId) :
- Sur l'entité Contact, ajoutez une relation sur N-1 sur l'entité Compteur que vous venez de créer. Cette relation peut être référentielle. Remarquez que cette relation ajoute automatiquement un champ de type Recherche sur l'entité Contact. Appelez-le Compteur Contact (new_ContactCounterId) :
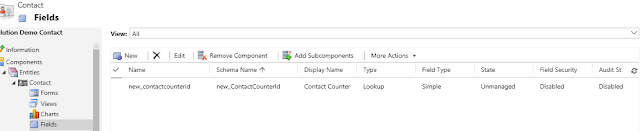
- Create a Single Line of Text field, on Contact entity named Reference ID. In the end, this field will store the auto-numbered field of the contact record. Place it on the body of the main form and publish the customizations.
- Créez maintenant un champ de type Une seule ligne de texte, sur l'entité Contact, et nommez-le Identifiant. Ce champ stockera au final l'identifiant généré sur l'enregistrement Contact. Placez-le dans le corps du formulaire puis publiez les personnalisations.
- Now, go the Settings Area, Counters and create a new record on that entity, with following values. Note that the Next String Id field has the expected format.
- Maintenant, allez dans Paramètres, Compteurs et créez un nouvel enregistrement de cette entité, avec les valeurs ci-dessous. Remarquez que le champ Prochain Identifiant a bien le format attendu.
- Final step. Create a new real-time workflow (be careful not to use a background one), on the Contact entity with following design and steps :
- Dernière étape. Créez un nouveau workflow temps-réel (attention à ne pas le créer en arrière-plan), sur l'entité Contact, avec les paramètres et étapes suivants :
- Step 1 : Assigning the Lookup Field with the record created : Update on Contact with the following Properties :
- Etape 1 : Remplir le champ de Recherche avec l'enregistrement Compteur Contact. Il s'agit d'une étape "Mettre à jour", sur le contact, avec les propriétés suivantes :
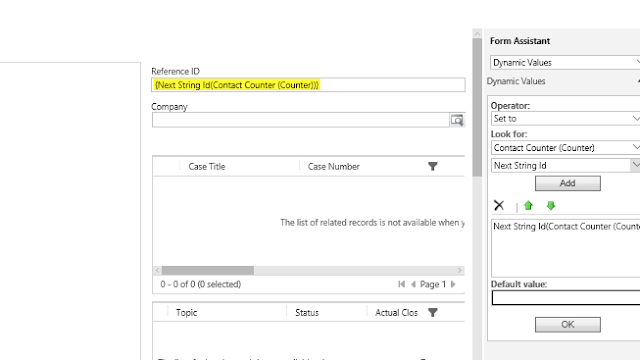
- Step 2 : Setting the Reference ID with the value stored in the associated (just before) record.
- Etape 2 : Remplir le champ Identifiant avec la valeur du champ "Prochain Identifiant" de l'enregistrement associé à l'étape précédente.
- Step 3 : Increment the Next Number of the Counter record, using the child workflow :
- Etape 3 : Incrémenter le numéro suivant de l'enregistrement Compteur, en utilisant le workflow enfant :
- Save and activate the workflow. And, maybe hard to believe, but you're good to go ! Let's try...
- Enregistrez et activez le workflow. Et c'est peut-être dur à croire, mais nous avons terminé ! Essayons ...
First, by creating a 3 contacts manually (2 with main form, 1 with Quick Create) :
Tout d'abord, en créant 3 contacts manuellement (2 avec le formulaire principal, 1 avec le formulaire rapide) :
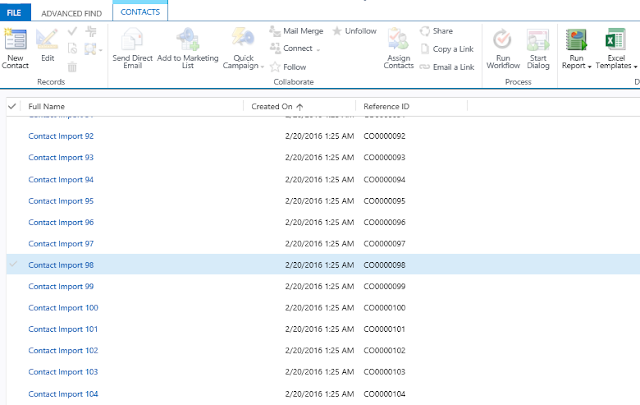
Next, by importing (using a basic csv file and the Import Wizard) 421 contacts :
Ensuite en important (avec un fichier plat CSV et le module standard d'import) 421 contacts :
And you're automated numbering is achieved on Contact entity, using custom entities, calculated fields, and real-time workflows, and absolutely no code. Moreover, if you want to add an auto-numbering on the Account entity, you don't have to start from the beginning but by creating a custom relationship between the account entity and the counter entity, creating the record "Account" on the Counter entity and the real-time workflow on Account creation. And even more, you can add the Counter entity and the child workflow to an unmanaged solution, export it as a managed one and deploy it to several organizations.
Et votre champ d'identifiant, généré automatiquement, est prêt sur l'entité Contact ; réalisé avec une entité personnalisée, un champ calculé, des workflows temps-réel et sans une seule ligne de code. De plus, si vous souhaitez l'ajouter sur l'entité Compte, vous n'avez qu'à créer une relation entre Compte et Compteur, créer un enregistrement sur l'entité Compteur et un workflow temps-réel, déclenché à chaque création de compte. Encore mieux, vous pouvez même ajouter l'entité Compteur ainsi que le workflow enfant dans une solution pour l'importer sur plusieurs organisations.
But where is the magic there ? Why do we have to wait CRM 2015 to do this ? What is the reduced functionality with CRM 2013 ? I will discussed it now :
Mais ? Comment ça marche ? Pourquoi attendre CRM 2015 ? Pourquoi cela fonctionne-t-il mais en mode dégradé sur CRM 2013 ? Pourquoi pas avant ? Quelques éléments de réponse :
The key point of this method is the "real-time workflow" feature introduced by CRM 2013. You can see on this blog post from
Auto-Numbering Workflows Real-Time vs Asynchronous all the explanations you need. In fact, the method exposed in this post inspired me for mine, I am just going a little step further with the formatting and the usage of calculated fields, introduced with CRM 2015. That's why with CRM 2013, you can only have an sequence number, without the formatting.
Le point le plus important dans la méthode ici, est l'utilisation des workflows temps-réels, introduit dans la version 2013. Vous pouvez voir dans cet article
Auto-Numbering Workflows Real-Time vs Asynchronous toutes les explications nécessaires (en anglais). En réalité, la méthode que j'ai présentée dans cet article reprend exactement les mêmes concepts, j'ai juste poussé un peu plus loin la mise en forme de l'identifiant en utilisant la notion de champ calculé, introduite dans la version 2015. C'est la raison pour laquelle, avec CRM 2013, vous pourrez avoir un champ incrémenté, mais pas de mise en forme (en tout cas pas aussi précise).
Of course, this method as a few drawbacks. First, the formula used by the calculated field will be the same for all the entities you want to enhance. But you can modify this by adding more fields on the Counter entity (examples : Suffix, Year etc.). Everything is in the formula.
Bien entendu, cette méthode a quelques inconvénients. Tout d'abord, la formule utilisée dans le champ calculé sera la même pour toutes les entités sur lesquelles vous souhaitez utiliser un champ généré. Mais vous pouvez améliorer la formule en ajoutant des champs sur l'entité Compteur (tels que Suffixe, Année, etc.). Tout est dans la formule utilisée.
The other drawback I see is the usage of fixed record assignment in the workflow (by using the record Contact on the entity Counter). The problem of this is when deploying the workflow by importing a solution. To work instantly, you have to be sure that the record exists and that it has the same GUID in your target environment than in your source. You can manage this by using the Configuration Migration Tool or the Package Deployer (tools found in the Dynamics CRM SDK). Otherwise, your workflow will contain some errors and you'll have to correct it manually. By the way, if you have this kind of issues (called "Broken Reference"), I'm currently working on how to detect and correct them automatically, I will write another post about it shortly.
Le deuxième inconvénient à cette méthode est l'utilisation d'un enregistrement "fixe" dans un workflow (l'enregistrement Compteur Contact de l'entité Compteur). Le problème de cette pratique est lors de l'import du workflow dans une solution. Pour fonctionner immédiatement, il faut s'assurer d'une part que l'enregistrement existe mais surtout qu'il a le même GUID dans l'organisation cible et dans l'organisation source. Cela peut être géré de plusieurs manières (Configuration Migration Tool, Package Deployer, qui sont des outils présents dans le SDK proposé par Microsoft, ou encore par import d'organisation). Sinon, votre workflow sera en erreur et vous devrez le corriger manuellement. Par ailleurs, si vous avez déjà rencontré ce genre de problème assez (voire très) pénible, je travaille actuellement sur une méthode permettant de les corriger automatiquement, je posterai un article sur le sujet d'ici peu.


No comments:
Post a Comment